The sidebar is an additional area on the site, where you may place information for your visitors. You might use the sidebar to navigate a site, advertise something, as a way to gain new subscribers and followers, showcase or highlight specific content.
With Hairsalon WordPress theme, there are 2 pre-made area sidebars for Blog page and Shop page. Therefore, you don’t need to create a widget area for them, you can simply add widgets to the pre-made widget area directly.
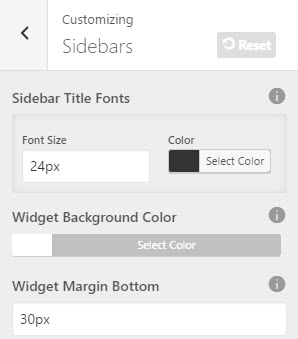
Sidebar Options:
To configure for widgets in Sidebar areas, go to Dashboard >> Appearance >> Customize >> Sidebars. Users can configure Tittle Fonts, Widget Background Color, Widget Margin Bottom for widgets of sidebar, footer sidebars, siebar shop, footer banner, mega menu widgets.
After you finished customizing this section click the Save & Publish button.
How To Create A Sidebar Area:
Hairsalon WordPress theme allows you to create unlimited amount of sidebars, and these sidebars can be assigned to several areas of the site such as the sidebar, footer sidebars, sidebar shop, footer banner, mega menu widgets. To learn more about widget ready areas, please see the steps below to understand how to create a sidebar.
Step 1 – Navigate to Appearance >> Widgets >> give name of a new sidebar under field “Create new sidebar” click the “Create” button. You can add as many sidebar as you need.
Step 2 – Once created, you’ll see your new sidebar on the right side.
Step 3 – On the left side, you will see all the widgets you can use.
Step 4 – Simply drag and drop the widget you want into your widget section. You can then customize the widget to your liking.
Step 5 – You can rearrange the order of widgets on a widget section by simply dragging the widgets to place.
Step 6 – Make sure you click the ‘Save’ button to save the widgets added to your widget section.

1. Blog Sidebar
Setting Blog Page:
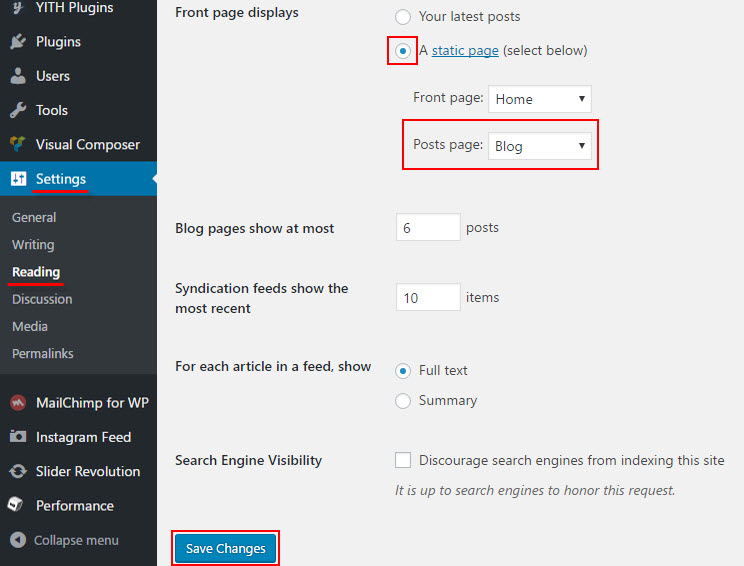
Blog page is a page to show posts. To select a page is blog page, you need to go to Dashboard >> Setting >> Reading >> select “A static page” >> select page for “Posts page” >> click “Save Changes” button.
Blog Layout Options:
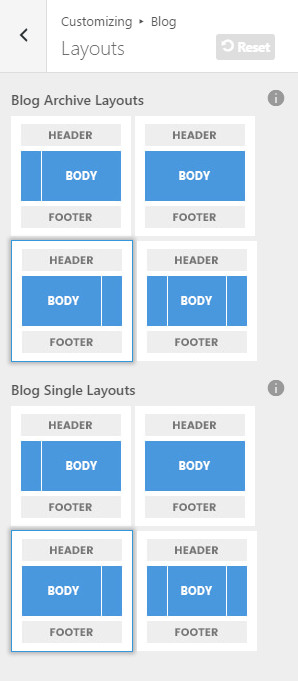
To configure layout for blog page, go to Dashboard >> Appearance >> Customize >> Blogs >> Layouts. This is the place for you to select an alignment for your Blog page – which is place to show posts or for single post. You can choose whether or not to use the sidebar, as well as positioning it in a layout with 1 or 2 columns.
1 – No side bar at all
2 – One sidebar, located on the left
3 – One sidebar, located on the right
4 – Two sidebar, located on the left and right.
After you finished customizing this section click the Save & Publish button.
How To Add Widgets To Blog Sidebar:
Hairsalon includes a wide array of custom widgets in addition to the default widgets WordPress offers. All widgets are found in the Dashboard >> Appearance >> Widgets tab. There are various customization options and fields for each individual widget, and they are all self explanatory. You can put as many widgets as you want inside of Blog Sidebar. Please read below for information on how to add widgets to Blog Sidebar.
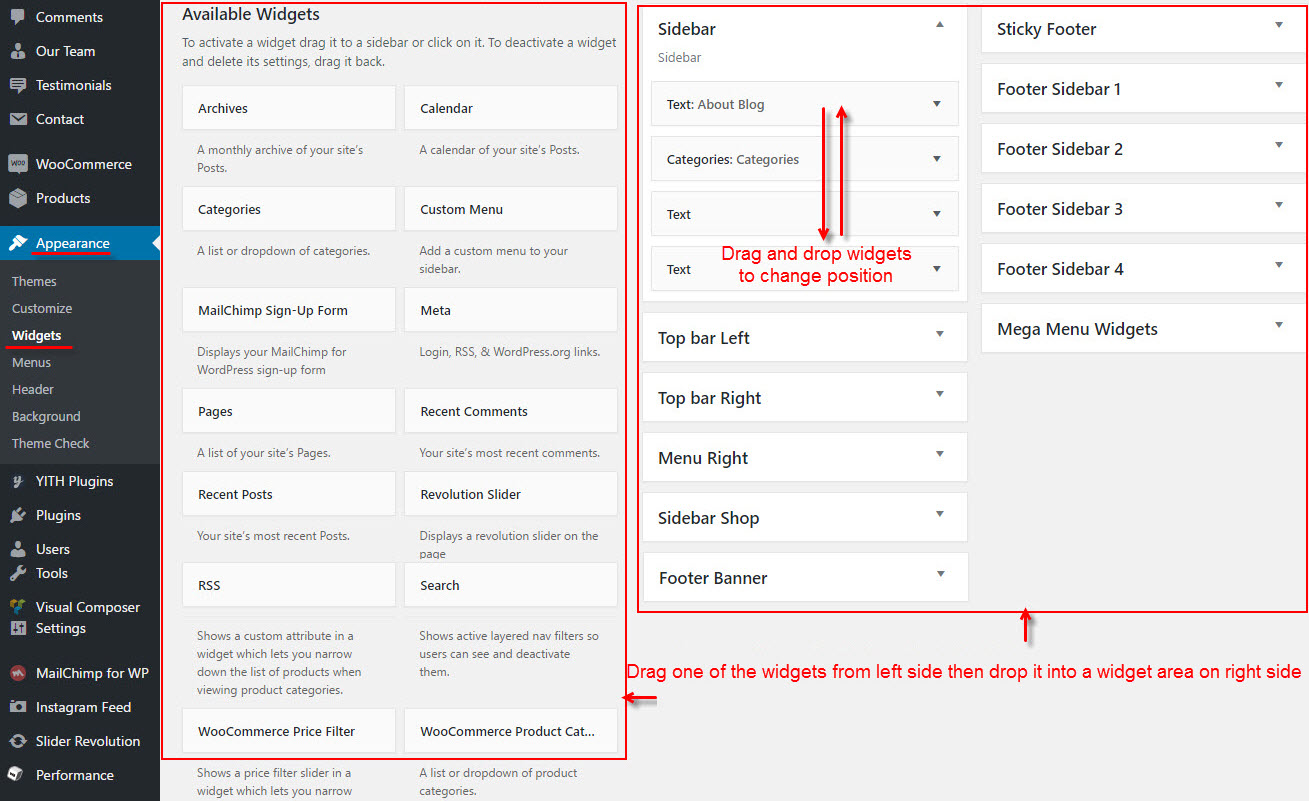
Step 1 – Navigate to the Appearance >> Widgets tab to access the list of widgets and widget areas. The left hand side shows all the widgets you can use. The right hand side shows all the different widget areas you can add widgets to, including Blog Sidebar.
Step 2 – Simply drag and drop the widget you’d like to add into Sidebar area on the right side.
Step 3 – To rearrange widgets on a widget section, just drag and drop the widgets into the order you’d like.
Step 4 – When finished, make sure to click the “Save” button in the widget editing box to save your changes.
2. Shop Sidebar
Setting Shop Page:
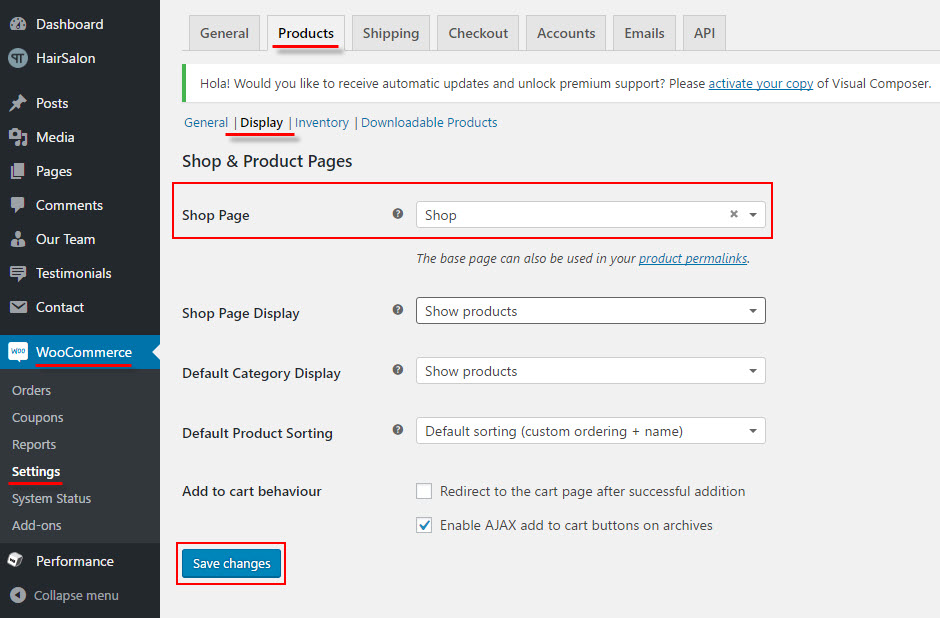
Shop page is a page to show products, product categories. To select a page is shop page, you need to go to Dashboard >> WooCommerce >> Settings >> Products tab>> Display sub tab >> select Shop page >> click “Save Changes” button.
Shop Page Layout Options:
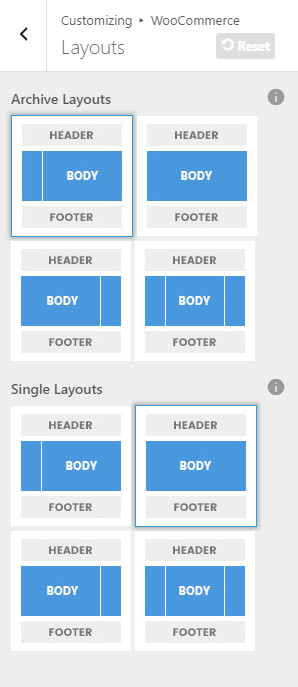
To configure layout for shop page, go to Dashboard >> Appearance >> Customize >> WooCommerce >> Layouts. This is the place for you to select an alignment for your Shop page – which is place to show products, product categories. You can choose whether or not to use the sidebar, as well as positioning it in a layout with 1 or 2 columns.
1 – No side bar at all
2 – One sidebar, located on the left
3 – One sidebar, located on the right
4 – Two sidebar, located on the left and right.
After you finished customizing this section click the Save & Publish button.
How To Add Widgets To Shop Sidebar:
Please read below for information on how to add widgets to Shop Sidebar.
Step 1 – Navigate to the Appearance >> Widgets tab to access the list of widgets and widget areas. The left hand side shows all the widgets you can use. The right hand side shows all the different widget areas you can add widgets to, including Shop Sidebar.
Step 2 – Simply drag and drop the widget you’d like to add into Shop Sidebar area on the right side.
Step 3 – To rearrange widgets on a widget section, just drag and drop the widgets into the order you’d like.
Step 4 – When finished, make sure to click the “Save” button in the widget editing box to save your changes.