1. Import Demo
The easiest way to import our demo content is to use our Thim Core Demo Importer. Our importer will give you all pages and posts, several sample sliders, widgets, Customize Options, assigned pages, and more. This is recommended to do on fresh installs. It will not replace content like posts, pages, portfolio, etc , it will not delete current menus but configure our demo menus, and it will not replace but add sliders. Another method is manually importing.
1. Automatically
Using Thim Core Demo Importer
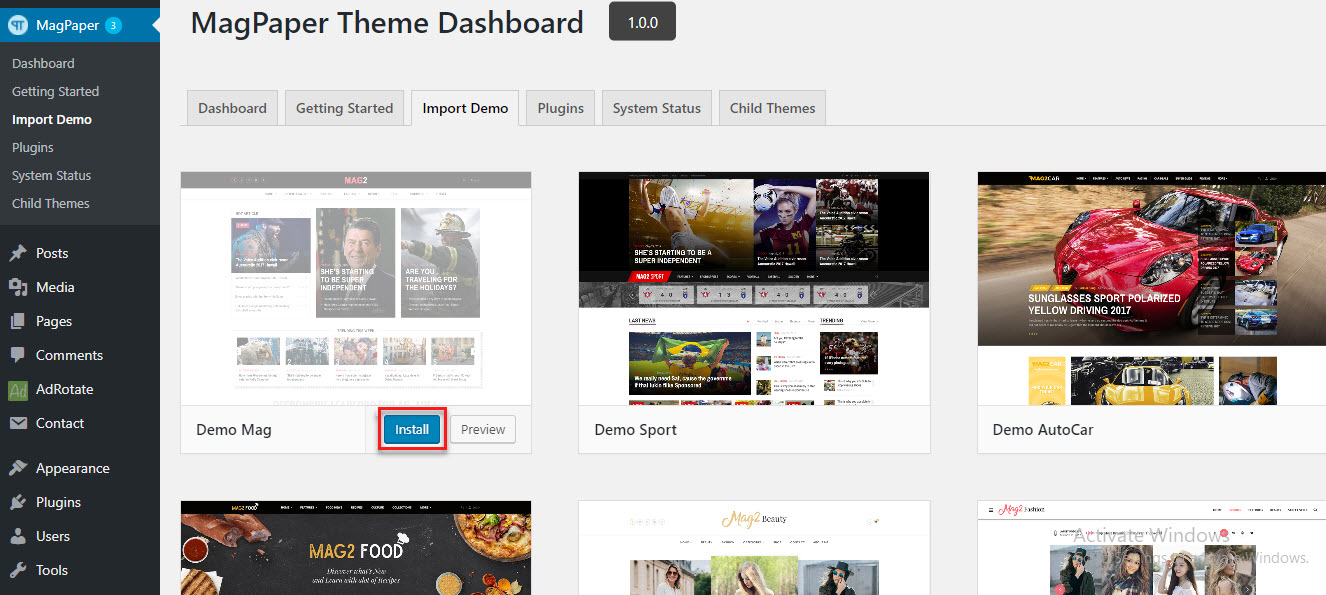
Step 1 – Navigate to Dashboard > Import Demo.
Step 2 – Select a demo and click Install button.
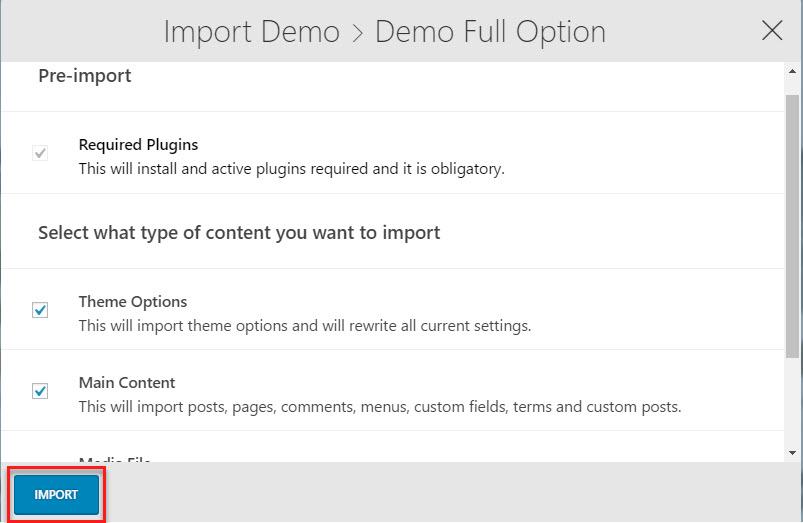
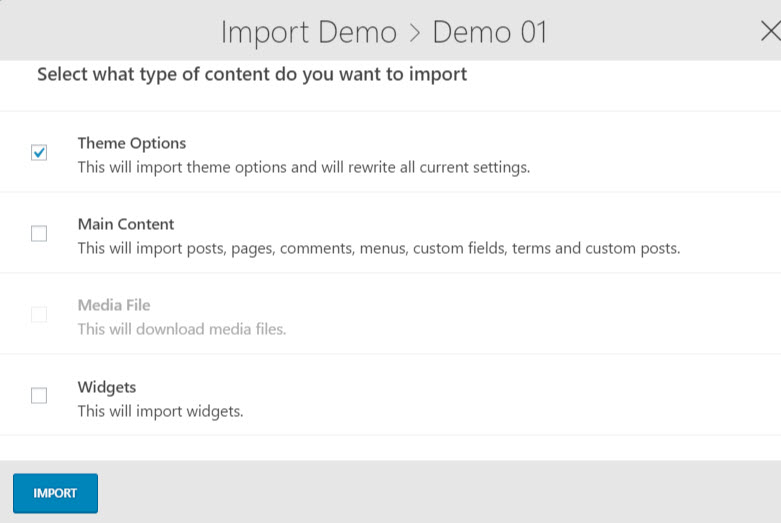
Step 3 – Select what type of content do you want to import and click Import button.
The import process may take up to 5 minutes. Enjoy a cup of tea while you wait ?.
2. Manually Import
In the event that your host will not make changes, or you cannot get the demo content to import, you can then import the individual elements manually. Continue reading below to learn how to manually import demo content.
Where To Find Demo Files
There is a “content.xml” file placed in folder name-theme/inc/data/demos, just select a demo you want then find this file for importing demo.
How To Import XML Files
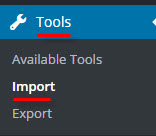
Step 1 – Go to Dashboard >> Tools >> click Import.
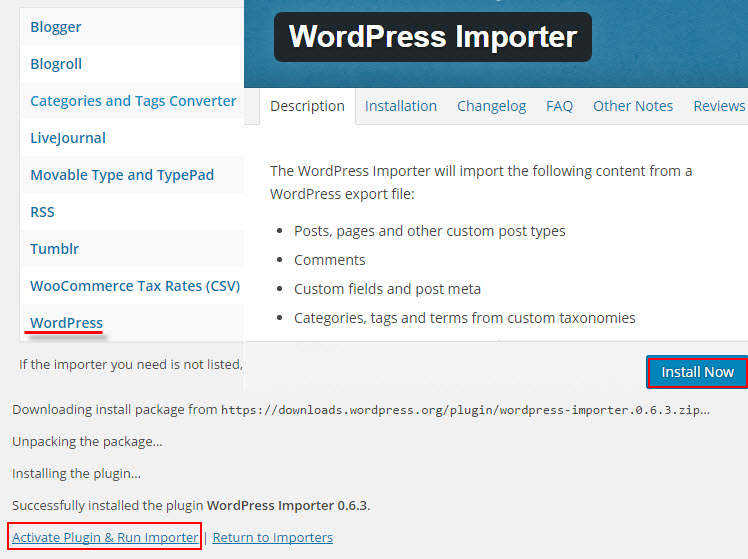
Step 2 – On the Import page, select WordPress from the list and install the WordPress Importer Plugin.
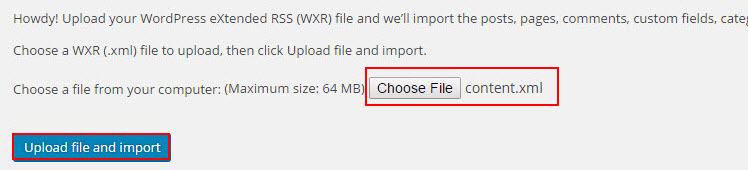
Step 3 – Click Choose File, then choose the content.xml file from your desired demo folder. For example, if you would like to install the Demo-01, you would install the content.xml inside the Demo-01 folder.
Step 4 – Once you’ve chosen the correct file, click the Upload File and Import button.
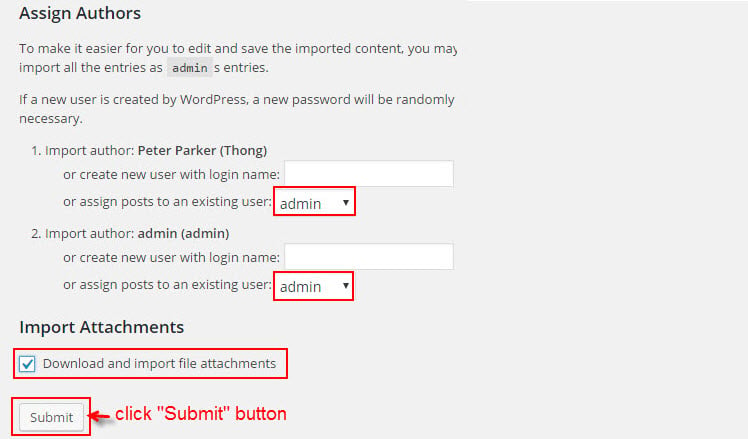
Step 5 – Select admin in the dropdown list, and don’t forget to check the ‘Download and Import File Attachments’ checkbox.
Step 6 – Wait until WordPress is finished importing, then click the Have Fun link to return to your dashboard.

How To Import Theme Options
Go to Dashboard > Demo Importer >> Select a demo that you imported XML file and click Install button >> Select content “Theme Options” and click Import button.
How To Import Widget Data
Step 1 – Install and activate the Widgets Settings Importer/Exporter plugin developed by Voce Communications.
Step 2 – Go to Dashboard >> Tools >> Widget Settings Import.
Step 3 – Click the Select A File button, and select the widgets_data.json file from the same folder you got the XML and theme option files you’e just imported. Example: name-theme/inc/data/demos/demo-01/widget.
Step 4 – Once you’ve selected the correct file, click Show Widgets Settings.
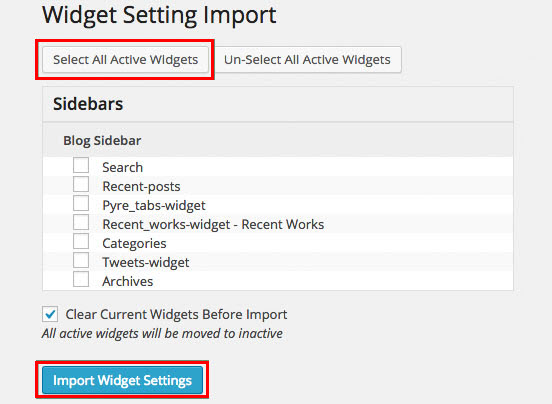
Step 5 – Click the Select All Active Widgets button first, then click the Import Widget Settings button.
Step 6 – You will receive a success message letting you know you’ve successfully imported the widget settings.
2. Elements Setup
After importing demo data successfully, some elements setup of the third-party plugins will not be included. You need to complete them.
1. Setup Contact Form
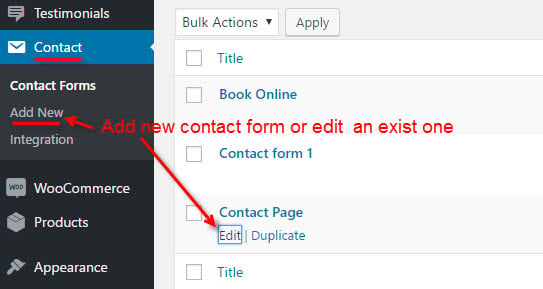
Once installed and imported demo data, you can manage it in the Dashboard >> Contact >> click Add New to create new contact forms for different parts of your website or edit the existing ones via the Edit option in Contact Forms tab.
How To Setup Contact Forms:
1. Form:
You can put any content of contact form and click button “Save” then a shortcode will be auto created. Just copy this shortcode into post, page, or text widget content that you want.
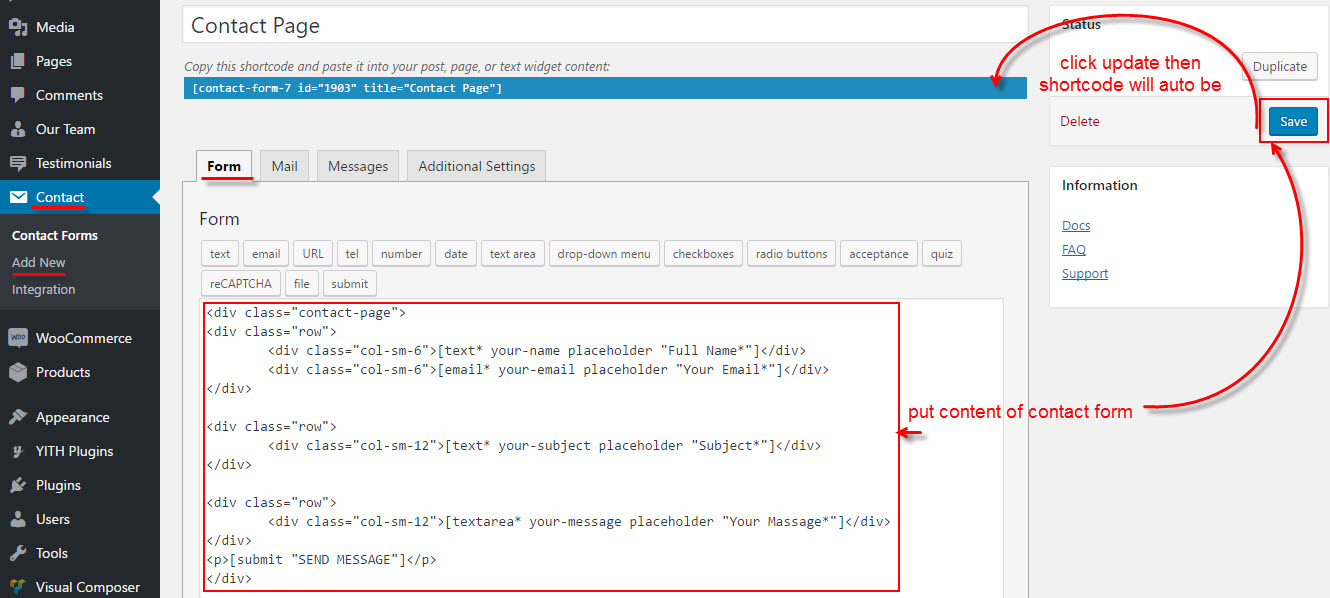
Demo Mag Paper theme has 3 styles contact form available for Contact Page, just click Edit option in Contact Forms tab then copy and paste below content into contact form:
Contact form 1:
<div class=”contact-form-1″><div class=”contact-form-1″><div class=”row”> <div class=”col-sm-4″>[text* your-name id:contact-name class:contact-name placeholder “Name*”]</div> <div class=”col-sm-4″>[email* your-email id:contact-email class:contact-email placeholder “Email*”]</div><div class=”col-sm-4″>[number* your-phonenumber id:contact-phonenumber class:contact-phonenumber placeholder “Phone Number*”]</div></div>
<div class=”row”> <div class=”col-sm-12″>[text* your-subject id:contact-subject class:contact-subject placeholder “Subject*”]</div></div>
<div class=”row”> <div class=”col-sm-12″>[textarea* your-message id:contact-message class:contact-message placeholder “Message*”]</div></div><div class=”sb-contact”>[submit “SUBMIT”]</div></div>
Contact Form 2:
<div class=”contact-form-2″><div class=”contact-form-2″><div class=”row”> <div class=”col-sm-6″>[text* your-name id:contact-name class:contact-name placeholder “Name*”]</div> <div class=”col-sm-6″>[email* your-email id:contact-email class:contact-email placeholder “Email*”]</div></div><div class=”row”><div class=”col-sm-6″>[number* your-phonenumber id:contact-phonenumber class:contact-phonenumber placeholder “Phone Number*”]</div><div class=”col-sm-6″>[text your-website id:your-website class:your-website placeholder “Website”]</div></div>
<div class=”row”> <div class=”col-sm-12″>[text your-subject id:contact-subject class:contact-subject placeholder “Subject”]</div></div>
<div class=”row”> <div class=”col-sm-12″>[textarea your-message id:contact-message class:contact-message placeholder “Message”]</div></div><div class=”sb-contact”><button type=”submit” class=”wpcf7-submit”>SUBMIT</button></div></div>
Contact Form 3:
<div class=”contact-page”><div class=”contact-page”><div class=”row”> <div class=”col-sm-4″>[text* contact-name id:contact-name class:contact-name placeholder “Name*”]</div> <div class=”col-sm-4″>[email* contact-email id:contact-name class:contact-name placeholder “Email*”]</div><div class=”col-sm-4″>[number* contact-phonenumber id:contact-phonenumber class:contact-phonenumber placeholder “Phone Number*”]</div></div>
<div class=”row”> <div class=”col-sm-12″>[text* contact-subject id:contact-subject class:contact-subject placeholder “Subject*”]</div></div>
<div class=”row”> <div class=”col-sm-12″>[textarea* contact-message id:contact-message class:contact-message placeholder “Message*”]</div></div><div class=”sb-contact”>[submit “SUBMIT”]</div></div>
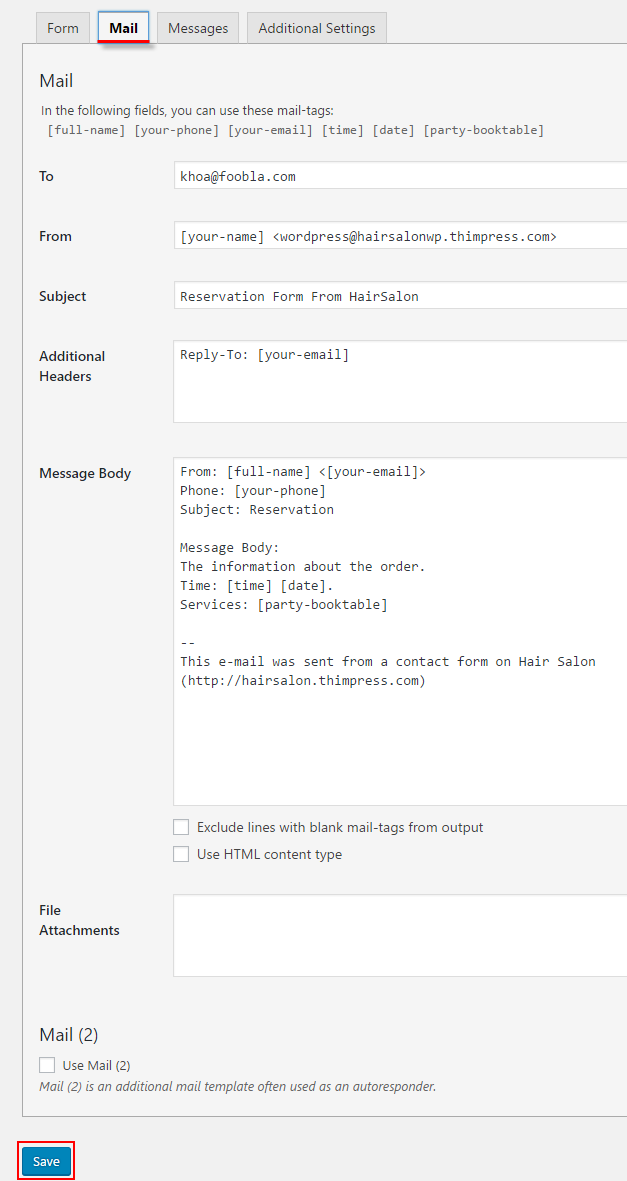
2. Email:
The most important settings you need to define are located in the Mail tab. To learn more about setting email, you can refer document of contact form plugin. Notes that click “Save” after setting.
2. Setup Mailchimp
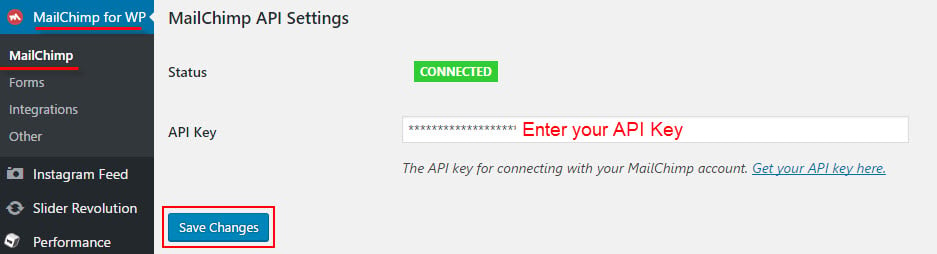
Setting MailChimp API:
Go to Dashboard >> MailChimp For WP >> MailChimp >> Setting your API Key then click “Save Changes“. To learn how to get API key, you can refer document of MailChimp.
Create MailChimp Form:
Go to Dashboard >> MailChimp For WP >> MailChimp >> Forms:
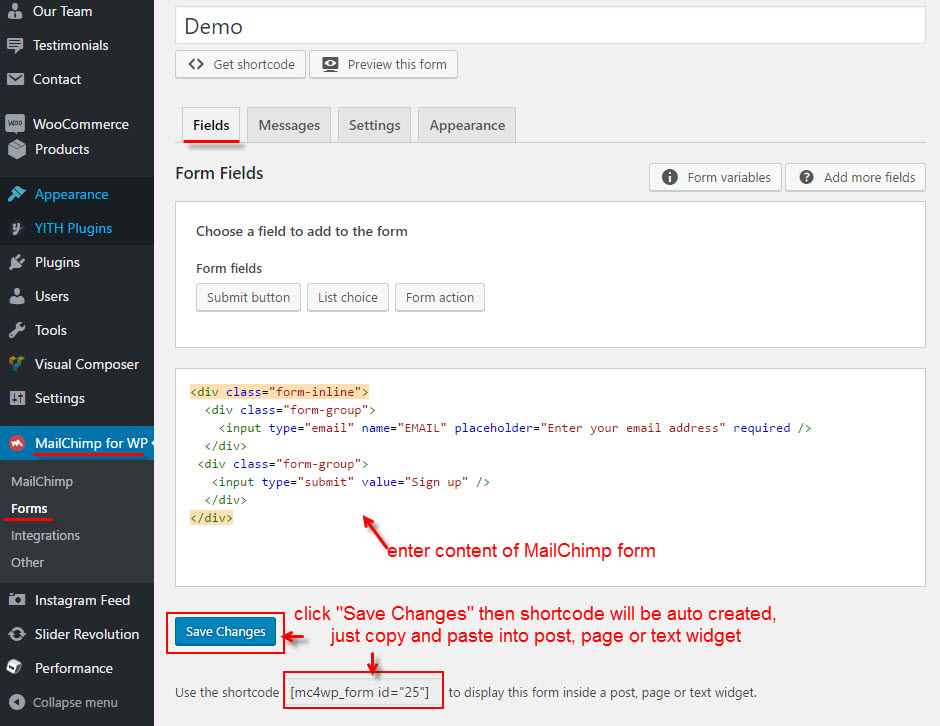
Demo Mag Paper theme has a style MailChimp form available, just copy and paste below content into your MailChimp form:
<input type=”email” name=”EMAIL” placeholder=”Enter your email” required>
<button type=”submit”>Subscribe</button>